Advertisement

For the base
500g strong white bread flour
300ml warm water
1 x 7g sachet easy blend yeast
1 teaspoon salt
2 tablespoons extra virgin olive oil
For the topping
7 or 8 slices chorizo
3 or 4 sliced cooked mushrooms
1 red onion
7-8 tablespoons passata
Handful of grated cheddar
Handful of grated mozzarella
Small jar of dried italian seasoning (available in all good supermarkets in the spice section)
Salt
Pepper
preparation 5 mins • you cook for 29 mins •
Serves 2
Watch a 30 second preview of my cook-along video below
These pizzas are so easy, so adaptable and so much fun to make. Once you try this recipe, you'll never go back to supermarket frozen pizzas again. Homemade dough is so nice and the great thing is that you can literally put what you want on top. Like anchovies but hate pineapple? It's your pizza, you decide. This is a two part recipe and makes two pizzas. In part one we make the dough using my video for granary bread. The method is exactly the same, just use the ingredients below, (white flour instead of granary etc). In part two we roll out the dough and build the pizzas.
Large mixing bowl for the dough
2 pizza trays (lined with baking parchment if they are not non-stick)
Rolling pin
Spoon to stir
Advertisement
Before you start, have all the ingredients, your bowl and scales out to one side of your work surface, leaving space to knead the dough next to it. Put a small handful of white flour into a ramekin or small bowl. Now click here!
Before you start, have your newly risen dough ready, along with your rolling pin and pizza trays. Now click here!
Advertisement
This week's newsletter recipe is for my Tangy Lamb Tagine. This is a great dish packed with flavour - all you have to do is throw a bunch of ingredients in a pot and let them cook for a couple of hours and the result is magic! Slow cooked lamb shoulder, with the sweetness of apricot and the gentle heat of cayenne pepper - this dish will warm up your senses in no time.
Throughout November, the theme for my newsletters is 'Winter Warmers'. Each of this month's delicious recipes contain just enough spice to warm those winter months. I have 4 great exclusive recipes and cook-along videos for you, from Satay Pork to Curried Cauliflower Soup. With valuable cooking tips & fun food news from around the web, sign up for free today.
Simply enter your email address - it won't go to 3rd parties and you won't receive any junk mail!
Weigh out the ingredients into your mixing bowl. Add 2 teaspoons of salt and the packet of yeast. Give everything a light whisk together. Lightly flour your work surface now, whilst you have dry hands. Next make a well in the middle of the bowl and pour in the the olive oil and water to the bowl. Next mix everything together with your fingers until you have one big sticky lump of dough.
Tip the contents onto the floured work surface and start kneading. This will take about 10 minutes, although if this is your first time making dough, it's probably best to add a couple of minutes so you can get the hang of it. To knead, use the heel of your hand and push the mix away from you, stretching the dough. At the same time, use the fist of your other hand to pull the dough towards you. Then fold the dough back on itself so that you have the same rough shape as you started with, turn the dough 90 degrees and repeat this for 10 minutes. Everything is super stickyto start with and your hands will be covered with the dough but don't worry. Keep repeating the process of pushing and pulling the dough, folding it back up and turning. After a few minutes, you can start to pick the dough from your hands and knead onto it, to pick up the bits. If the dough is completely sticking to the work top, then add a little flour to your surface from the ramekin you set aside. After about 5 minutes, the texture will start to change, and the dough will be starting to stretch easier. Keep picking the bits off your hands, or lightly rub your hands together and knead knead knead for 10 minutes. The way to tell that the dough is properly kneaded is by the fact that it will have become really stretchy and when you knead it, it stretches loads and doesn't break.
Take a large bowl and put a little oil in the bottom and spread it around with your hands so that the bowl is lightly oiled. Put the dough into the bowl and add a little oil to the top, rubbing all over with your hands. Now all you need to do is cover the bowl with a clean tea towel and leave to rise for about 1 - 1.5 hours. An airing cupboard is perfect. The dough needs to roughly double in size, that's how you know it's done.
Once the dough has risen, it's time to roll it out. Preheat your oven to 240c. Lightly flour your work surface and then tip your bowl up and empty the dough onto the surface. Dab your knuckles in the flour and then lightly punch the pizza so that it flattens. (knocking the air out). Divide the dough in 2 (one bit for each pizza) then shape it again into a rough circle with your hands. Pinch the ends together and you should be fine. Now you need to roll the dough into the shape of your tray. Add another little sprinkle of flour onto the work surface and then a little flour to the rolling pin. Roll out the dough checking occasionally that the dough isn't sticking. Once you have it to the shape you want, pop it on your pizza tray. Repeat the process with the other half of dough until you have 2 pizza bases.
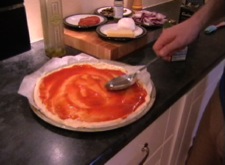
Clear down your surface and bring in your toppings. Pour onto the bases 3-4 tablespoons of passata and spread with the back of a spoon. Now it's time for the toppings. Arrange the onion, chorizo & mushrooms in whatever pretty way you want. Next generously scatter over some of the italian seasoning along with a good pinch of salt & pepper. Lastly, sparingly sprinkle some cheddar and mozzarella over the pizza. Repeat with the other pizza then bake in the oven for 12-14 minutes and you're done!
I hope that you enjoy it.


Advertisement

All content © 2012 TheAmateurChef.co.uk - Privacy Policy